Corso! Sprint 02
04 Dec 2025In sprint 02 I had very limited capacity to keep coding. I’ve been busy with consulting and other tasks related to the business, however, I still found some hours to work on it, and my solutions to make Corso! online took that into consideration.
Remembering our last post, the major goal of this sprint was to deploy Corso! somewhere over the web, so I could use it on my phone or desktop. If you are new here, Corso! is a web app that will initially handle my credentials over the internet in a secure manner. To make it work, we had to harden the app’s security aspects.
Authentication trade-offs
My goal was to leverage the master password, since this is a personal secret, and build a basic auth mechanism to prevent unauthorized access to my APIs. Most enterprise apps use JWT tokens because they provide a stateless and decentralized way to communicate with apps and APIs. This scales much better and avoids extra DB lookups. However, the implementation for my use sounded too heavy, and I didn’t have much time available. Other projects I’ve worked on used full SSO solutions because of multi-tenant requirements, leveraging OAuth2.0, which is pretty much a standard in the industry.
After evaluating, I realized I am the only one using it. I need it secured but still have to balance implementation speed, so I chose cookie-based authentication. It only requires backend implementation, is pretty simple, but does not scale well since my API will now be stateful. In any case, this project is a major exploration, and once I start scaling for more users, this is something to revisit. But as our rule of thumb goes: keep it as simple as possible and avoid premature optimization. This guarantees I move fast and the solution fits the budget.
| SSO - OAuth 2.0(with JWT) | JWT only | Cookie Session Based | |
|---|---|---|---|
| Implementation complexity | High - Another component multi-tenant setup, front / backend integration | Medium - Can leverage libraries, but front / backend implementation | Low - backend implementation only |
| Scalability | High - can plug many client applications, multi tenant setup and stateless | High - Stateless ideally to scale horizontally | Low - is heavy dependent on browser makes the backend stateful not ideal to scale horizontally |
| Maintenance and cost | High - more complex setup, usually 3rd party solutions are plugged | Low - one time setup, and usually through libraries | pretty low - small session setup most api frameworks already provide built-in solutions no need of external dependencies |
Cookie Session Authentication
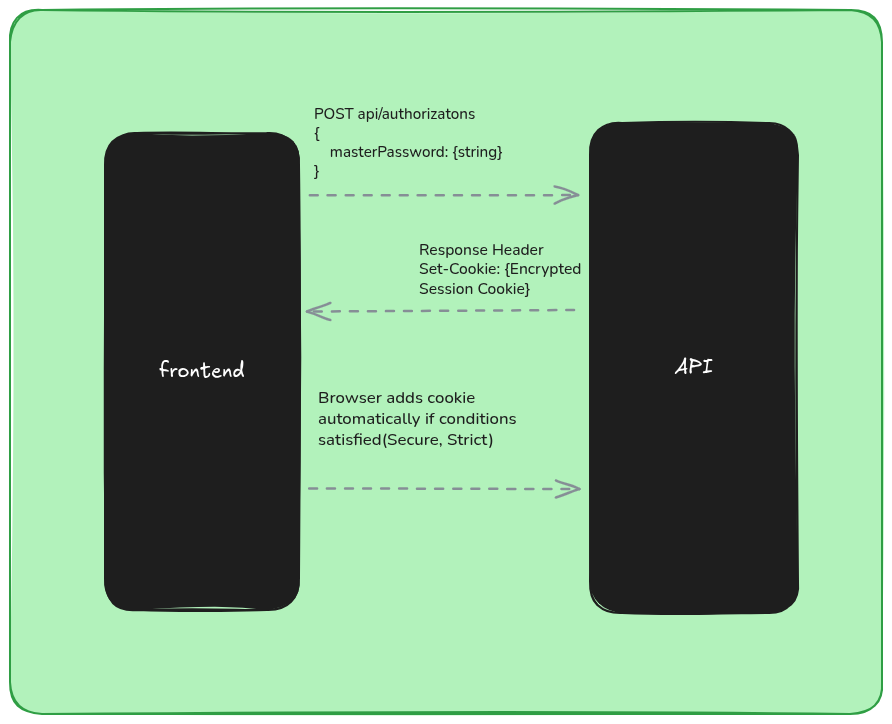
To start, we use an authorization endpoint that validates whether the provided master password is correct and then creates the authentication cookie on the backend. This cookie is stored server-side only. When authorization succeeds, the API returns the HTTP header response Set-Cookie with the authentication cookie value stored in the session.
For security reasons, the cookie is configured as:
-
HttpOnly (JavaScript code cannot access it)
-
Secure (only transferred over HTTPS connections)
-
Strict (only transferred to the same domain)
In the last post, we stored the master password in the keyring. In this sprint, we completely changed that implementation, and here we’ll explore the new approach. The master password is transferred over HTTPS, then hashed with a SALT, and compared against the hash stored in our settings.
using System.ComponentModel.DataAnnotations;
using CorsoApi.Infrastructure;
using Microsoft.AspNetCore.Mvc;

namespace CorsoApi.Controllers;

[ApiController]
[Route("api/[controller]")]
public class AuthorizationsController(IConfiguration configuration, IHasher hasher) : ControllerBase
{
    private readonly IConfiguration configuration = configuration;

    [HttpPost]
    public async Task<IActionResult> Post([FromBody] AuthorizationRequest request)
    {
        var storedHash = configuration["masterHash"]!;
        var salt = configuration["salt"]!;
        var hashOfRequest = hasher.Create(request.MasterPassword, salt);

        if (hashOfRequest != storedHash)
        {
            return Unauthorized();
        }

        HttpContext.CreateAuthenticationSession();
        return Ok();
    }
}

public record AuthorizationRequest
{
    [Required]
    [StringLength(32, MinimumLength = 8)]
    public required string MasterPassword { get; set; }
};
Since we now store the pre-computed hash for comparison, I had to move the hashing logic. To reuse it for computing the hash of the master password from the request, I created a hashing abstraction and moved the implementation from the Vault to Argon2Hasher.
//Interface that abstract the hashing algorithm
namespace CorsoApi.Infrastructure;

public interface IHasher
{
    string Create(string from, string salt);
}
//Implementation of the Hashing algorithm.
using System.Text;
using Konscious.Security.Cryptography;

namespace CorsoApi.Infrastructure
{
    public class Argon2Hasher : IHasher
    {
        public string Create(string from, string salt)
        {
            using var argon2 = new Argon2id(Encoding.UTF8.GetBytes(from));
            argon2.Salt = Encoding.UTF8.GetBytes(salt);
            argon2.DegreeOfParallelism = Environment.ProcessorCount;
            argon2.Iterations = 4;
            argon2.MemorySize = 65536; //64MB
            return Convert.ToBase64String(argon2.GetBytes(32));
        }
    }
}
An interesting nuance is that Argon2 takes hardware configuration as input to generate the hash, the hash that was computed in my local machine was not same when deployed to the server, because the processor count were different, then I had to recompute the hash on server and store it.
Killing the mosquito with a bomb
In Corso!’s first iteration, I created an abstraction called SecretStore. The idea was simple: in the local environment I’d use keyring to handle secrets, and once I decided where the app would live, I could just switch the implementation at runtime through DI. Azure gives me free hosting for a .NET app, and I can even use Key Vault or environment variables that encrypt at rest. The IConfiguration abstraction provided by the SDK already handles all those nuances, and I can still use .NET User Secrets to avoid checking sensitive data into source control.
The code was refactored to read configuration directly from IConfiguration instead of SecretStore, and the class was removed from the project. “Good architects remove more than they add.”
var builder = WebApplication.CreateBuilder(args);

//Infrastructure services
builder.Services.AddSingleton<IAccountsVault, AccountsVault>(opts =>
{
    //hash now reads from Configuration
    var masterHash = builder.Configuration["masterHash"]
        ?? throw new InvalidOperationException("masterHash configuration is missing");

    return new AccountsVault("db.dat", masterHash);
});
builder.Services.AddScoped<IHasher, Argon2Hasher>();
Secrets local setup:
dotnet user-secrets init
To add the necessary secret to your user-secrets:
dotnet user-secrets set "salt" ""
dotnet user-secrets set "masterHash" ""
dotnet user-secrets list
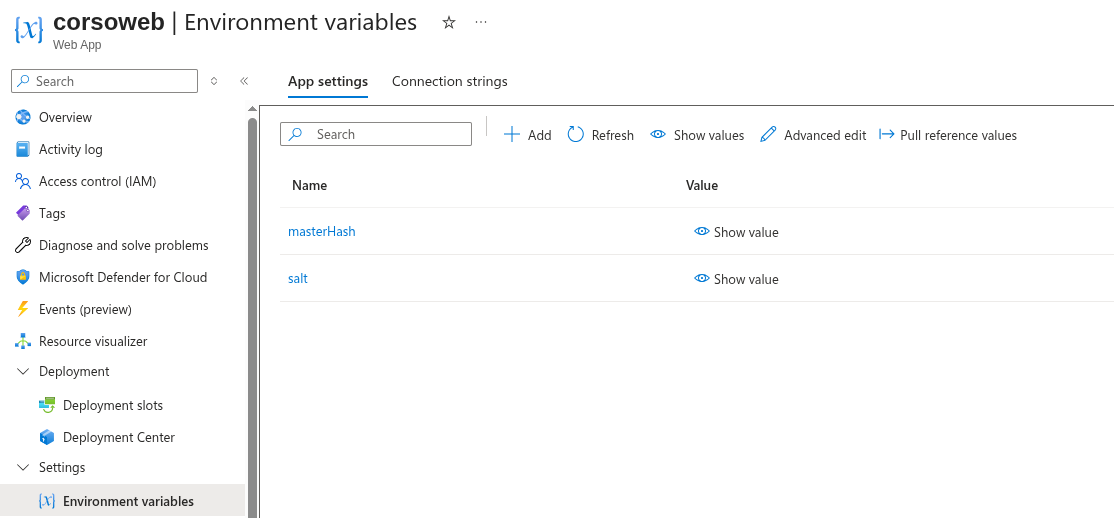
Once the code is deployed to Azure, I set the sensitive data as environment variables (encrypted at rest), and no code changes are required.
Warning!!
There’s a real trade-off here. The more you lean on a cloud provider’s “easy” features, the deeper you slide into vendor lock‑in. Sometimes that’s fine (even unavoidable) but it’s dangerous to let it creep into the core of your app without noticing. If you’re still unsure where your code will live long‑term, keep your options open: run the app on multiple hosts, compare costs, and don’t be afraid to walk away from the cloud entirely, just like DHH did.
Scarcity = Innovation - The deployment workflow
I wanted to stay honest with my deadline, and at this point I had only two days left to finish the sprint.
The mission
Find a free hosting provider. One of the main goals of this project is keeping costs minimal, so it made sense to move away from my 1Password subscription.
-
It needed to be .NET‑friendly. Most free hosts require dockerizing the app, and I didn’t have time for that.
-
It had to run under a single domain, since the session cookie wouldn’t travel across domains and API calls would fail.
-
It needed to provide free HTTPS support.
As mentioned earlier, I ended up hosting everything on an Azure App Service. It integrates nicely with GitHub Actions, and setting up a YAML workflow is straightforward.
Serving Angular + API under the same domain
The next challenge was deploying both the Angular app and the API to the same server under the same domain. The solution was to use the backend itself to serve the static files. Ideally, these files should live in a CDN see Static Web App but as a solo user, performance isn’t critical right now. There will be plenty of opportunities to optimize later.
To automate deployment, I updated my angular.json so the build output goes directly into the backend’s wwwroot folder. Since I’m using a monorepo setup, this worked beautifully.
"options": {
    //Change output path default is dist folder
    "outputPath": {
        "base": "../backend/wwwroot",
        "browser": ""
    },
    "index": "src/index.html",
    "browser": "src/main.ts",
    "polyfills": [
        "zone.js"
    ],
    "tsConfig": "tsconfig.app.json",
    "inlineStyleLanguage": "scss",
    "assets": [
        {
        "glob": "**/*",
        "input": "public"
        }
    ],
    "styles": [
        "src/styles.scss",
        "node_modules/@angular/material/prebuilt-themes/cyan-orange.css"
    ],
    "scripts": []
},
Now the workflow is able to build angular and later the backend here is the GitHub Actions workflow:
# Docs for the Azure Web Apps Deploy action: https://github.com/Azure/webapps-deploy
# More GitHub Actions for Azure: https://github.com/Azure/actions

name: Build and deploy ASP.Net Core app to Azure Web App - corsoweb

on:
  push:
    branches:
      - main
  workflow_dispatch:

jobs:
  build:
    runs-on: ubuntu-latest
    permissions:
      contents: read #This is required for actions/checkout

    steps:
      - uses: actions/checkout@v4

      - name: Set up Node.js
        uses: actions/setup-node@v4
        with:
          node-version: '24.x'

      - name: Install Angular dependencies
        run: npm install
        working-directory: ./web

      - name: Build Angular app
        run: npm run build -- --configuration production
        working-directory: ./web

      - name: Set up .NET Core
        uses: actions/setup-dotnet@v4
        with:
          dotnet-version: '9.x'

      - name: Build with dotnet
        run: dotnet build --configuration Release

      - name: dotnet publish
        run: dotnet publish -c Release -o $/myapp

      - name: Upload artifact for deployment job
        uses: actions/upload-artifact@v4
        with:
          name: .net-app
          path: $/myapp

  deploy:
    runs-on: ubuntu-latest
    needs: build
    permissions:
      id-token: write #This is required for requesting the JWT
      contents: read #This is required for actions/checkout

    steps:
      - name: Download artifact from build job
        uses: actions/download-artifact@v4
        with:
          name: .net-app

      - name: Login to Azure
        uses: azure/login@v2
        with:
          client-id: $
          tenant-id: $
          subscription-id: $

      - name: Deploy to Azure Web App
        id: deploy-to-webapp
        uses: azure/webapps-deploy@v3
        with:
          app-name: 'corsoweb'
          slot-name: 'Production'
          package: .
A few adjustments were needed in Program.cs to serve the frontend artifacts from the wwwroot folder:
app.UseExceptionHandler();
app.UseHttpsRedirection();

//added
app.UseDefaultFiles();
//added
app.UseStaticFiles();

app.UseCors("AllowCorsoWeb");
app.UseSession();
app.MapControllers();

//added
app.MapFallbackToFile("index.html");
await app.RunAsync();
The order of these middlewares is important to avoid conflicts and unexpected behavior.
Coming Next
Corso! is now live at https://corsoweb.azurewebsites.net/ taking into consideration I work only part-time on it this is good progress.
I notice, I cannot be so aggressive because I need balance with my consulting activities, and also I’d like to make some adjustments and improvements to this blog.
Sprint 03
Now Corso! is available over the wire, but I am still not confident to deposit my credentials on it. Anyone can access this web page even if protected behind the master password. The goal of next sprint will be white listing the access, only myself will be able to see the web site.
You can find the code on GitHub, see ya!